A Short Tutorial
FLUID is an amazingly powerful little program. However, this power comes at a price, as it is not always obvious how to accomplish seemingly simple tasks with it. This tutorial will show you how to generate a complete user interface class with FLUID that is used for the CubeView program below.
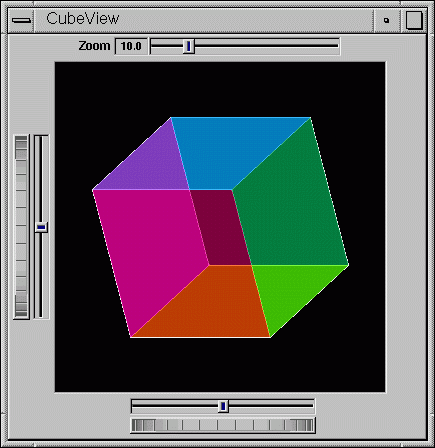
The window is of class CubeViewUI, and is completely generated by FLUID, including class member functions. The central display of the cube is a separate subclass of Fl_Gl_Window called CubeView. CubeViewUI manages CubeView using callbacks from the various sliders and rollers to manipulate the viewing angle and zoom of CubeView.
At the completion of this tutorial you will (hopefully) understand how to:
Use FLUID to create a complete user interface class, including constructor and any member functions necessary.
Use FLUID to set callbacks member functions of a custom widget classes
Subclass an Fl_Gl_Window to suit your purposes.
The CubeView Class
The CubeView class is a subclass of Fl_Gl_Window. It has methods for setting the zoom, the x and y pan, and the rotation angle about the x and yaxes.
You can safely skip this section as long as you realize the CubeView is a sublass of Fl_Gl_Window and will respond to calls from CubeViewUI, generated by FLUID.
The CubeView Class Definition
Here is the CubeView class definition, as given by its header file "test/CubeView.h":
class CubeView : public Fl_Gl_Window {
  public:
    CubeView(int x,int y,int w,int h,const char *l=0);
    // this value determines the scaling factor used to draw the cube.
    double size;
    /* Set the rotation about the vertical (y ) axis.
     *
     * This function is called by the horizontal roller in CubeViewUI
     * and the initialize button in CubeViewUI.
     */
    void v_angle(float angle){vAng=angle;};
    // Return the rotation about the vertical (y ) axis.
    float v_angle(){return vAng;};
    /* Set the rotation about the horizontal (x ) axis.
     *
     * This function is called by the vertical roller in CubeViewUI
       and the
     * initialize button in CubeViewUI.
     */
    void h_angle(float angle){hAng=angle;};
    // the rotation about the horizontal (x ) axis.
    float h_angle(){return hAng;};
    /* Sets the x shift of the cube view camera.
     *
     * This function is called by the slider in CubeViewUI and the
     * initialize button in CubeViewUI.
     */
    void panx(float x){xshift=x;};
    /* Sets the y shift of the cube view camera.
     *
     * This function is called by the slider in CubeViewUI and the
     * initialize button in CubeViewUI.
     */
    void pany(float y){yshift=y;};
    /* The widget class draw() override.
     * The draw() function initialize Gl for another round of
     * drawing then calls specialized functions for drawing each
     * of the entities displayed in the cube view.
     */
    void draw();

  private:
    /* Draw the cube boundaries
     * Draw the faces of the cube using the boxv[] vertices, using
     * GL_LINE_LOOP for the faces. The color is #defined by
     * CUBECOLOR.
     */
    void drawCube();

    float vAng,hAng; float xshift,yshift;

    float boxv0[3];float boxv1[3]; float boxv2[3];float boxv3[3];
    float boxv4[3];float boxv5[3]; float boxv6[3];float boxv7[3];
};
The CubeView Class Implementation
Here is the CubeView implementation. It is very similar to the "cube" demo included with FLTK.
#include "CubeView.h"
#include <math.h>

CubeView::CubeView(int x,int y,int w,int h,const char *l)
            : Fl_Gl_Window(x,y,w,h,l)
{
    vAng = 0.0; hAng=0.0; size=10.0;
    /* The cube definition. These are the vertices of a unit cube
     * centered on the origin.*/
    boxv0[0] = -0.5; boxv0[1] = -0.5; boxv0[2] = -0.5; boxv1[0] = 0.5;
    boxv1[1] = -0.5; boxv1[2] = -0.5; boxv2[0] = 0.5; boxv2[1] = 0.5;
    boxv2[2] = -0.5; boxv3[0] = -0.5; boxv3[1] = 0.5; boxv3[2] = -0.5;
    boxv4[0] = -0.5; boxv4[1] = -0.5; boxv4[2] = 0.5; boxv5[0] = 0.5;
    boxv5[1] = -0.5; boxv5[2] = 0.5; boxv6[0] = 0.5; boxv6[1] = 0.5;
    boxv6[2] = 0.5; boxv7[0] = -0.5; boxv7[1] = 0.5; boxv7[2] = 0.5;
};

// The color used for the edges of the bounding cube.
#define CUBECOLOR 255,255,255,255

void CubeView::drawCube() {
/* Draw a colored cube */
#define ALPHA 0.5
    glShadeModel(GL_FLAT);

    glBegin(GL_QUADS);
      glColor4f(0.0, 0.0, 1.0, ALPHA);
      glVertex3fv(boxv0);
      glVertex3fv(boxv1);
      glVertex3fv(boxv2);
      glVertex3fv(boxv3);

      glColor4f(1.0, 1.0, 0.0, ALPHA);
      glVertex3fv(boxv0);
      glVertex3fv(boxv4);
      glVertex3fv(boxv5);
      glVertex3fv(boxv1);

      glColor4f(0.0, 1.0, 1.0, ALPHA);
      glVertex3fv(boxv2);
      glVertex3fv(boxv6);
      glVertex3fv(boxv7);
      glVertex3fv(boxv3);

      glColor4f(1.0, 0.0, 0.0, ALPHA);
      glVertex3fv(boxv4);
      glVertex3fv(boxv5);
      glVertex3fv(boxv6);
      glVertex3fv(boxv7);

      glColor4f(1.0, 0.0, 1.0, ALPHA);
      glVertex3fv(boxv0);
      glVertex3fv(boxv3);
      glVertex3fv(boxv7);
      glVertex3fv(boxv4);

      glColor4f(0.0, 1.0, 0.0, ALPHA);
      glVertex3fv(boxv1);
      glVertex3fv(boxv5);
      glVertex3fv(boxv6);
      glVertex3fv(boxv2);
    glEnd();

    glColor3f(1.0, 1.0, 1.0);
    glBegin(GL_LINES);
      glVertex3fv(boxv0);
      glVertex3fv(boxv1);

      glVertex3fv(boxv1);
      glVertex3fv(boxv2);

      glVertex3fv(boxv2);
      glVertex3fv(boxv3);

      glVertex3fv(boxv3);
      glVertex3fv(boxv0);

      glVertex3fv(boxv4);
      glVertex3fv(boxv5);

      glVertex3fv(boxv5);
      glVertex3fv(boxv6);

      glVertex3fv(boxv6);
      glVertex3fv(boxv7);

      glVertex3fv(boxv7);
      glVertex3fv(boxv4);

      glVertex3fv(boxv0);
      glVertex3fv(boxv4);

      glVertex3fv(boxv1);
      glVertex3fv(boxv5);

      glVertex3fv(boxv2);
      glVertex3fv(boxv6);

      glVertex3fv(boxv3);
      glVertex3fv(boxv7);
    glEnd();
};//drawCube

void CubeView::draw() {
    if (!valid()) {
        glLoadIdentity(); glViewport(0,0,w(),h());
        glOrtho(-10,10,-10,10,-20000,10000); glEnable(GL_BLEND);
        glBlendFunc(GL_SRC_ALPHA, GL_ONE_MINUS_SRC_ALPHA);
    }

    glClear(GL_COLOR_BUFFER_BIT | GL_DEPTH_BUFFER_BIT);
    glPushMatrix(); glTranslatef(xshift, yshift, 0);
    glRotatef(hAng,0,1,0); glRotatef(vAng,1,0,0);
    glScalef(float(size),float(size),float(size)); drawCube();
    glPopMatrix();
};
The CubeViewUI Class
We will completely construct a window to display and control the CubeView defined in the previous section using FLUID.
Defining the CubeViewUI Class
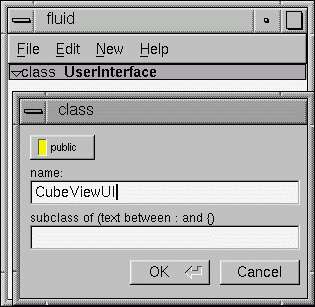
Once you have started FLUID, the first step in defining a class is to create a new class within FLUID using the New->Code->Class menu item. Name the class "CubeViewUI" and leave the subclass blank. We do not need any inheritance for this window. You should see the new class declaration in the FLUID browser window.
Adding the Class Constructor
Click on the CubeViewUI class in the FLUID window and add a new method by selecting New->Code->Function/Method. The name of the function will also be CubeViewUI. FLUID will understands that this will be the constructor for the class and will generate the appropriate code. Make sure you declare the constructor public.
Then add a window to the CubeViewUI class. Highlight the name of the constructor in the FLUID browser window and click on New->Group->Window. In a similar manner add the following to the CubeViewUI constructor:
A horizontal roller named hrot
A vertical roller named vrot
A horizontal slider named xpan
A vertical slider named ypan
A horizontal value slider named zoom
None of these additions need be public. And they shouldn't be unless you plan to expose them as part of the interface for CubeViewUI.
When you are finished you should have something like this:
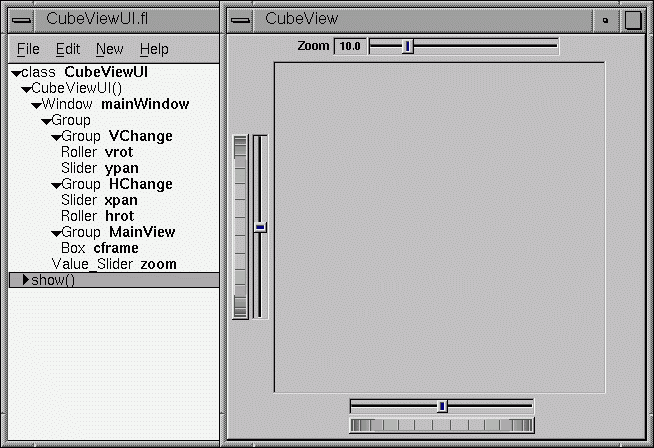
We will talk about the show() method that is highlighted shortly.
Adding the CubeView Widget
What we have is nice, but does little to show our cube. We have already defined the CubeView class and we would like to show it within the CubeViewUI.
The CubeView class inherits the Fl_Gl_Window class, which is created in the same way as a Fl_Box widget. Use New->Other->Box to add a square box to the main window. This will be no ordinary box, however.
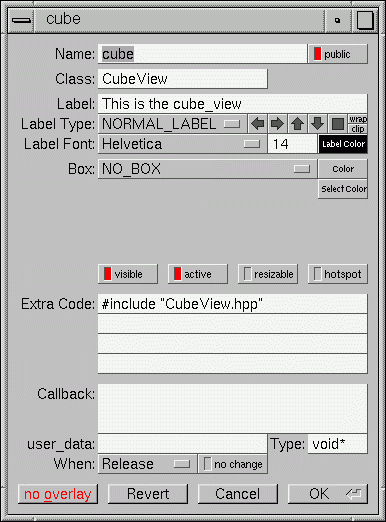
The Box properties window will appear. The key to letting CubeViewUI display CubeView is to enter CubeView in the "Class:" text entry box. This tells FLUID that it is not an Fl_Box, but a similar widget with the same constructor. In the "Extra Code:" field enter #include "CubeView.h"
This #include is important, as we have just included CubeView as a member of CubeViewUI, so any public CubeView methods are now available to CubeViewUI.
Defining the Callbacks
Each of the widgets we defined before adding CubeView can have callbacks that call CubeView methods. You can call an external function or put in a short amount of code in the "Callback" field of the widget panel. For example, the callback for the ypan slider is:
cube->pany(((Fl_Slider *)o)->value());
cube->redraw();
We call cube->redraw() after changing the value to update the CubeView window. CubeView could easily be modified to do this, but it is nice to keep this exposed in the case where you may want to do more than one view change only redrawing once saves a lot of time.
There is no reason no wait until after you have added CubeView to enter these callbacks. FLUID assumes you are smart enough not to refer to members or functions that don't exist.
Adding a Class Method
You can add class methods within FLUID that have nothing to do with the GUI. An an example add a show function so that CubeViewUI can actually appear on the screen.
Make sure the top level CubeViewUI is selected and select New->Code->Function/Method. Just use the name show(). We don't need a return value here, and since we will not be adding any widgets to this method FLUID will assign it a return type of void.
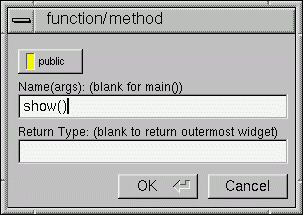
Once the new method has been added, highlight its name and select New->Code->Code. Enter the method's code in the code window.
Adding Constructor Initialization Code
If you need to add code to initialize class, for example setting initial values of the horizontal and vertical angles in the CubeView, you can simply highlight the Constructor and select New->Code->Code. Add any required code.
Generating the Code
Now that we have completely defined the CubeViewUI, we have to generate the code. There is one last trick to ensure this all works. Open the preferences dialog from Edit->Preferences.
At the bottom of the preferences dialog box is the key: "Include Header from Code". Select that option and set your desired file extensions and you are in business. You can include the CubeViewUI.h (or whatever extension you prefer) as you would any other C++ class.